Well it’s been a bit of a hiccup here and there but the shop
is finally at a point where I can start my knifemaking. By that I mean focus on
not just making a knife, but creating a process that I can repeat and/or adjust
for other knives. I’m not going to make just one knife design. I want to be
able to make all sorts of knives: custom fixed blades meant for skinning,
reproduction copies of common kitchen knives meant for food prep work, and
eventually custom folder knives meant for utility purposes only.
Now I need a design. I don’t intend to work without a
design. I am not some steel whispering guru or artist with the ability to
“sculpt” the work as I go. The steel does not “speak” to me. And I want
something more than just an idea or a picture to go by; I want an actual design
with measurements, overall sizes, etc.
The delay in the projects from unexpected hospital
bills resulted in allowing me to focus on the process for designing a knife.
And from the designs I’ve made so far, I have to say that I really enjoy the
design aspect of knifemaking. No doubt that it’s a process seldom used nowadays
due to available CAD software, but it’s still an enjoyable experience.
From the photos, one can see that I’ve been doing a bit of
drawing and sketching on some graph paper. I’ve seen a few custom knifemakers
out there now that still use this method. I’m sure that the process can be
improved through CAD software like AutoCAD or SolidWorks. But drawing it out
made me think more about overall size, blade length, location of the ricasso
line as well as which equipment or tool I had available to cut the shape. This
brings me to the point where I should start with some terminology in knives.
The overall design of the knife is something most
folks are probably familiar with. The example drawing I found online can at
least point to some of the terms I’ll be using. The ricasso area refers to a
section of the blade itself that is not ground, just shaped bar stock.
Common knife terms.
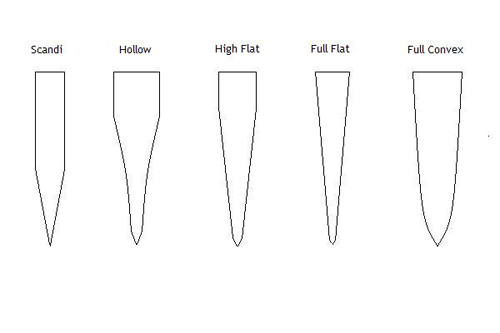
The grind is the section of the blade that has been shaped
to a specific cross-section (cut-away section) for creating a particular type
of cutting edge. The grind is very important to the purpose of the knife.
Creating a grind such as a hollow grind (which is good for skinning knives) for
a knife that may be intended for more utility purposes could be detrimental to
the edge for its original purpose. Note the examples in the image. One may have
to imagine cutting the knife blade exactly in half, then turning to see the
cross-section of the blade.
Some common knife grinds (cross sections).
The tip can have an effect on the purpose of the knife as
well. Take a look at some of the examples in the image. One may be very
familiar with some of the shapes in the image. An example would be the
clip-point style usually found on the well-known Bowie knives.
Knife Tips.
It should be noted here that I have no intention of making a
weapon. I’ll explain. All knives are made with a specific purpose in mind and
sometimes more than one purpose. This is understood by the grind (cut-away
section) of the blade as well as the tip of the blade. For example, a utility
knife meant for box-cutting would have a specific tip, maybe a sheep’s foot.
And the grind might be the double-bevel. The bevel might not cut too deeply but
it would help the knife retain a cutting edge longer because it’s fairly stout
and the tip may have more rigidity from that design making it less likely to
break. The overall description of such a knife indicates that it’s most likely
a utility knife and it doesn’t have a lot of value as a defensive weapon.
A weapon such as a fixed blade with a spear point or a
tanto point is much different than a utility knife like the one I described.
The photo of a tanto knife can show how different the tip is from a sheep’s
foot. Note also that the “tactical” knife has a cutting edge along the top of
the blade as well – this is called a spear point. The tip of such a design
obviously does not have the same strength for utility tasks as the sheep’s
foot. And the grind may be something like a full-flat grind or a saber grind.
This type of knife could have some use in utility but the tip indicates its
intended use as a weapon; a weapon that can be easily inserted into something.
Whether it’s for self-defense or possibly as an attack weapon, the so-called
“single-purpose knives” primary use is as a weapon. The tip and grind design
make it easier to use as a stabbing weapon rather than as a tool.
The SOG Trident Tanto
Kramer Gutshot Fighter with a spear point tip. Note that the
upper (spine) cutting edge does not go all the way back to the handle.
While it could be argued that a utility knife is still a
knife or a weapon, its intended use is as a tool. In fact, the design of such a
knife (utility) would make it a very poor weapon not at all suited for
self-defense. The tip would make the blade much harder to stab into something,
requiring much more force to be successful. The cutting edge isn’t meant to
slice deeply but rather make shallow cuts and keep its edge for extended use.
These (utility) knives are the designs I plan to make. In practice, I refuse to
make a weapon but one could make the argument that a knife, regardless of its
design, is still a weapon. But philosophically at least, when it comes to
knives, I won’t make weapons in this shop I’ll make tools.
So to add a bit more of a delay, I wanted to be sure
that I had a few safety items necessary for this shop and this includes
personal safety gear. The respirator I have is a medium size and the filters
are for particulates. Basically this means that the filters will not filter out
vapors but rather dust particles. If I need to protect myself from harmful
vapors (such as those resulting from consuming a bowl of lentils – LOL) then I
would require not only different filters, but a different type of respirator,
possibly a fully enclosed suit so that no vapors could get through the seal. As
it is now, my mask doesn’t really seal that well against my face because I have
a full beard. But that’s not a big concern because there won’t be a large break
in the seal to allow huge amounts of dust particles inside the mask.
My 3M half-face respirator with P100 flexi-filters and my
face shield.
Additionally, I had to make sure I could mount a
bucket to catch most of the particles from grinding. This is the stock removal
method of knifemaking and it produces a lot of sparks especially from the lower
carbon steels. This bucket will also provide me with a quench bowl to keep the
blade material from overheating while I grind. Grinding produces a lot of heat
and if the material heats up too much it will affect the properties of the
steel. Having this bucket here allows me to quench a blade I’m working on as it
heats up to keep it cool and continue working on it longer.
It won’t catch all of the particles but it’ll
help catch a lot of them. Plus, having water in this bucket makes a handy-dandy
quenching pot.
And finally, I didn’t want to start all of this
without my good friend Mr. Fire Extinguisher. Seriously though, this method of
knifemaking will produce a lot of heat and a lot of sparks. Add into that
anything that can burn for a fuel (such as saw dust produces from sanding,
cutting or drilling any wood items) and you’ve now got yourself everything you
need to start a fire. My shop is located in my basement and I very much would
like to keep my house from catching on fire. Fire extinguishers can be
purchased at nearly any hardware store and this particular model of mine is the
dry chemical type. It’s good not only on typical wood, paper, or cloth type
fires but it’s also good against electrical types of fires. This will help to
protect any electrical equipment I have and I’ve got quite a lot setup in my
shop and I’m about to get even more.
Purchased from Home Depot.
Next up, the first design!


 .
.