So, I'm not real sure how I should go about this review because it might be a bit technical and it might be a bit of a rant but here goes.
It's been longer than I intended since my last post but it should soon pick back up. I've been fighting with a Grizzly and it's taken awhile to tame it - specifically the Grizzly G1015 Knife-maker's grinder.
One of the appeals to me of the Grizzly G1015 and I suspect appealing to many other frugal crafters is its cost. While it isn't quite the cheapest out there, it's definitely a far sight cheaper than the high-end professional grade knife-maker's grinders available. Some of these machines can reach well over a few thousand dollars including all accessories. So the Grizzly version at approx. $500 excluding taxes and shipping and it doesn't sting the wallet quite that much.
But the Grizzly has what many consider to be a well-deserved reputation for lowered quality in their construction. Most pieces required some minor tweaking in terms of repairs.Things like chasing the threads where the paint is so thick, or repairing dings and nicks gained during shipping, or even having to re-drill bracket mounting holes because the holes were literally oblong.

An example of the "quality" put into some of the equipment I've purchased. This is a spring-loaded handle for adjusting a tool rest, or rather what's left of the handle after its first and now only use.
These issues took up a bit of time but for me they weren't a major issue. I'm a machinist. I can handle that. No worries. But there was a major problem that I have to point out. The fit and finish of two critical pieces was, in a word, crap.
The assembly that holds the belt wheels attached to the grinder comes in two major sub-assemblies: the shaft and the receiver. Both are made from just low carbon steel with no alloys or special hardening. Just a simple steel shaft and its corresponding mating receiver. But there was such a huge amount of powder coating (paint) on the receiver that the shaft wouldn't fit. Now before folks start snickering like a popular cartoon duo let me just point out that we're talking about precision here. Precision that usually requires + or - around 5 thousands of an inch. That's 0.005" (inches) if you're not familiar with some of the terms. To put that into some perspective, human hair is typically around 0.001" to 0.002" in diameter.
So imagine a bore (hole) machined to a diameter (around 1.0") with a tolerance of +/-0.005 inches. The shaft would therefore have to get machined to a similar tolerance. This leaves very little room for anything else, certainly not a thick layer of powder coating.
The shaft and receiver with an attached collar. Both of these sections required a setup on a lathe and either some turning or some boring to get the two pieces to fit together properly.
Now in my shop I can jury-rig most quick and easy fixtures or jigs needed to do a job, but because the bore is so deep, I had nothing that could reach the lengths I needed to clean up the paint. I could clean up most at the top of the bore, but the bore extends about 12 inches. I tried sanding and later filing down the shaft to see if that could help but it wasn't enough. The two pieces would still bind. So I finally had to take it into the shop at school. I took the pieces into work and set them up on a lathe to do some turning and boring.
I don't have any photos of the operation to clean it up because I was in a rush to get this done and see if it could be repaired without replacing the item altogether. Also, with the Easter break coming, I wouldn't have access to the shop because the school would be closed and I didn't want to wait until the following week to see if the repairs worked.
The (finally) finished and operational Grizzly G1015 with a Norton Blaze 60grit belt. This particular belt has a reputation for quality and high material removal rate. I'll definitely check this one out.

Something else that became a major problem for the machine, one of the set screw holes was stripped out. I suspect that during the assembly of the machine (somewhere in Taiwan) that a high powered air ratchet or some equivalent small impact gun was used to speed up the assembly and this caused the threads to get stripped out. Oddly enough, the threads weren't stripped out completely, the top few threads of the hole remained intact.
This was a problem because the set screws are short enough to recess into the hole and hide the area that was stripped. So I didn't actually see the problem until I finally took the entire section apart out of frustration.
This section here kept shifting during operation which would cause the belt to "untrack" itself. Because of the unstable setup, the belt was extremely difficult to track it back to center. I could move the belt until it approached the center and then just as I would try to bump it just a little bit more it would shoot off the other side.
The straightedge and a similar method I used to sight the wheels to check for alignment. Grizzly does have some information to help realign the wheels but I had to do a good bit of searching to find it. I also put a bevel on each side of the drive wheel. This was recommended and at first I was concerned that doing so would make the tracking issue worse but it worked out fine.
So not only did I have to do some minor repairs on this machine once it was delivered, I actually had to take it into the shop and perform some major repairs to get it going. So was it worth it? Yes. The amount of enjoyment I'm getting from the machine does make it worth while. But, I can already tell that I'm not going to purchase another Grizzly, and I don't mean just the knife-maker's grinder. I mean that I will not purchase any other machines from Grizzly too.
That includes the small 14 inch woodworking band saw I was considering for the shop. If I ever needed to purchase another knife-maker's grinder, I'll simply save up the money and purchase the high-end professional grade machine. Its less likely to require so much effort to get it operational.
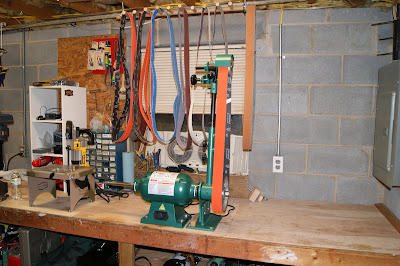
Also I finally managed to get the "modular" area up. That simply means that I have a section of work bench that I can add or remove machines as I need them. The machine mounting boards are simply 1/2 by 12 poplar. It would have been helpful if they were milled 4 square but when dealing with Lowe's Home Improvement I guess I can't be too picky about my purchases.
The cheap-ee 1 x 30 inch belt sander by Central Machinery. I purchased this from Harbor Freight, mostly because I could not find any alternative either online or locally.
The eye-bolt and the wood blocks act as a bench dog to allow me to temporarily mount a machine to the bench and benefit from the rigidity without having to mount the machine directly into the top work space.
Once I'm done with any machine in the modular area I can remove it and store it away and get some much needed bench space back.
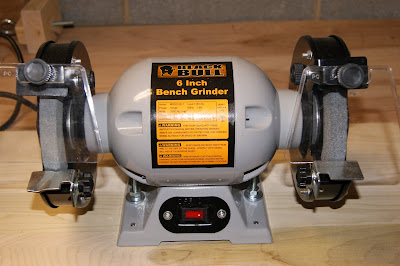
The Black Bull 6 inch bench grinder. Not a bad purchase so far. This one was bought from Tractor Supply Co.
The rack for the belts was made from a 1 inch dowel (pine - I think) and a 3/4 inch dowel. I drilled holes equidistant along the 1 inch and cut the 3/4 into "pegs" for hanging belts. Then I simply used wood screws to attach them to the 1 inch dowel. Took all of maybe 30 to 45 minutes to put together and only cost me the dowels and the hanger screws to purchase.
The completed "line" ready for knife production.
The Grizzly now runs great and I can't wait to get started on some knives! One thing I've noticed is that the Grizzly does have some vibration at the top of the machine. This isn't currently a problem but the vibration is a bit more than I'd like to see. I think I'll also add a brace to the back side of the upright arm and attach it to the work bench. This should hopefully add some rigidity to the top of the machine and lessen vibration.
Onwards to epic knife making adventure!