Sunday, July 29, 2012

The Blackbear First! (Of Hopefully Many!)


Sorry I haven't written any articles lately. One reason is because at our school we were finishing up the summer semester and preparing for graduation. But the main reason is because afterwards, I took a little time off for a knifemaking class! The class was held at Montgomery Community College in Troy, NC. It was a bit of a drive for me to have to commute so I decided to stay in a hotel near Albemarle, about 20 minutes west of Troy. Troy is located in Montgomery County and a large section of the county is federal forest - the Uwharrie National Forest; part of the Uwharrie (Yew-are-ee) Mountains. I've lived there for part of my life in the Uwharrie Mountains (in Randolph County) and despite the heat, it was a pleasure returning. The Uwharrie Mountains have beautiful rolling small mountains, many rivers and lakes, loads of trails, and a lot of other opportunities for the outdoor enthusiast. Unfortunately, I was really busy during my class so I was unable to take much time off and photograph anything during my stay. Oh well, maybe later I'll go back and take some photos for another video slideshow. I'm actually about to leave tomorrow for a short stay up in the Appalachian Mountains for a bit. I sincerely hope that it'll be cooler there than it has been around here. These Southeastern summers are brutal and I don't deal with them very well.


So the class was Intro to Tactical Knifemaking taught by Barry and Phillip Jones of Jones Knives. The two brothers have more than 20+ years experience making knives. There were eight people in the class. Most were from NC but at least 2 came from Chattanooga, TN. The instructors were very knowledgeable and helpful.


The first day we started right off cutting the material and shaping the overall knife. The second day was spent mostly putting the grind on our blades and preparing them for heat-treating. We started working on the handle scales on the third day and finished up the fourth day on our knife edges. I think that the most challenging part about this process was putting the grind on the blade. I kept messing up the grind at first but practice and a little patience improved my technique. The next day I was able to finish up the grind and catch up with the rest of the class. I wished that I had taken my camera for some pictures of the process. A fellow student was doing that and he said that once he gets them edited that he'll send me some. Hopefully I'll get those soon.


Anyway, here it is! The first ever completed knife I've made. The blade is made of 440C 2" x 5/32" stainless steel and it is a full tang knife. Note that this is not the design I had been working on in my shop prior to the class. The overall length is 7-1/2 inches and the blade is 3-1/4 inches. Because of the integral blade guard, the handle just barely allows for a full grip of my sized hands. The design is Barry Jones' (I think). Even though we were supposed to make tactical knives (which I don't really care much for), I envisioned a small game skinning knife with this design. We heat-treated the blades first at around 1880 degrees Fahrenheit. They were then air quenched (basically left to cool on their own) and then we tempered them at about 350 degrees. My blade was one of few that actually came out of the furnace from the first heating in a pretty good state. Its appearance on the blade didn't change very much at all. The handle scales are black linen micarta. And the pins are brass. Some of the imperfections in the blade have been left because I want to make sure I learn from those mistakes I've made. Still, overall I had a good time and I learned a lot. Not bad for a first completed attempt! Not sure what I should name it yet. Any suggestions?


Friday, July 6, 2012

The Amateur Crafter: 3.0: First Design – Continued

Let’s grind some metal!


After rough cutting the profile it’s time to finish it up smooth so that I can get a “feel” for how it fits in the hand without scales. First I used a 60 grit 2 x 72 belt. The photo shows the distinctive orange color that the Norton Blaze belts are known for. It was pretty easy, with one exception. The finger choil area. 


The smaller 1 x 30 belt sander. Although this sander seems to be really cheap, it did do a good job of roughing out some of the portaband saw cuts. However, I didn’t have a way to get into the finger choil area without taking more material off than needed along the lower part of the handle. I will also have to modify this belt sander as I could really use the rounded section of belt around the upper wheel. This would be useful for getting into curved areas that the Grizzly cannot reach but it also means removing a safety feature for the sander, in this case – a guard.


I tried switching to my Grizzly oscillating drum sander. This method could be much easier, but the heaviest grit I had available was 180.Not enough to really make a difference in finishing up the handle tang. I would need either a heavier grit drum or a different method.


Here one can see that I’ve mounted the template between some 2 x 4 pieces leftover from my Wen 10” Sliding Compound Mitre Saw table. The wood blocks allow me to use the vise to hold the blank without marring the surface. This allowed me to access the finger choil area and the rest of the bottom of the handle with a half-round bastard file. Not the easiest method, but it gave me a lot of control over the material removal process. Plus there were some “high spots” along the lower handle area from grinding where the belt couldn’t reach. This took longer than expected but the final result was a smooth finger choil area and a smooth lower handle section. I’ll post in a later article how I finished this with a method called draw-filing. 


The file I used to finish up the handle area. It produced a bit of a rough texture but with the smaller jeweler’s file similar to this one I was able to improve the finish.


The final template. I’ve since drilled a hole at the end corner of the handle for hanging on pegboard. This may turn out to be the same location for a lanyard hole. We’ll see. I didn’t want to add pin holes just yet as I may decide to use a different size pin in the future or I may even decide to use screw construction to mount the scales instead of pins. We’ll see.


The template and how it fits in my hand. The actual blade will probably include some jimping along the spine of the blade near the handle for greater control. Also, the blade will be 5/32" thick as opposed to the template which is 3/32" thick.


So what have I learned so far? Well, I’ve learned that despite the headache the Grizzly belt sander gave me, it works great. I especially love the Norton Blaze 60 grit 2 x 72 sanding belts. Those belts cut right through my 1095 steel like butter. I’ve learned to give a bit of extra material for those belts. Believe me, they won’t have any problems cutting extra material down. For future reference, I’ll remind myself to allow the belt to do most of the work for me and not try so much at cutting the blank as close as possible to the design with the portaband saw. I’ve also realized that in order to reach the gully of the finger choil, I will probably need to invest into more abrasive grit belts for the 1 x 30 as well as more abrasive sanding drums. There’s nothing wrong with switching over to a more time-honored method of material removal like hand filing, but if I wish to complete the profiling of the blades in a shorter amount of time, it would pay to have power tools and accessories that can help me accomplish this. Looks like I get to go shopping for more shop stuff!

Up next – a short production run!


Wednesday, June 27, 2012

The Amateur Crafter: Project 3.0: First Design!


I’ve decided to try and make a fixed blade, full length tang, drop point, possibly a convex grind, small neck knife. Whew! Imagine trying to explain that verbally. From the photos in the previous article, one can get a good idea of what I want. I like knives that are simple but have elegance in their design. I don’t necessarily feel that form should come before function but I do feel that there’s no reason that it can’t come in a close second. My knife’s purpose is a simple general purpose camping knife. Depending on the type of grind, it may see use for simple cutting tasks or even processing small wood pieces for a campfire. I may even try several different grinds, including a hollow grind for skinning carcasses. It’s important to note that I’m not making the knives just yet; I’m making the template. There are two reasons for this. First, if I wish to reuse this design I’d like an actual model to go by for future reference. Having a template already made to scale will make it much easier to duplicate in the future. Second, the paper that I've printed my design onto will not stand up very well to quenching but copying a completed template will. As stated in previous articles, this method will generate a lot of heat that can affect the properties of the blade steel. So, keeping the steel from heating up will be necessary as I grind the profile or the edge into the blade. I’ll use just plain water in the bucket in front of the Grizzly to do this. 

My first design attempt. As of this writing, I’m undecided if I wish to use 2 or 3 pins along the handle. Personally, I don’t much prefer pins more than I would screws but to keep the design simple, and because I’m still learning, I’ll use pins. For scales, I was going to use just “plain-jane” cheap, readily available wood. I would prefer if it were already milled 4 square but I can deal with it if it’s not. I may later decide to try some G10 or Micarta.


 The altered design. I felt that the height of the blade from edge to spine was a bit too much so I made it more subdued. I think that the final design looks quite good.


This is the knife that inspired my design. It comes from a picture in Custom Knifemaking: 10 Projects from a Master Craftsman by Tim McCreight.

But the grind can come later. I won’t start that process until I’ve got the shape and profile completed. And I won’t actually make the template with a grind anyway. So, to start with, I need some material. This is blade steel I’m working with. The size is 5/32” x 1-1/2” 1095 CRA steel purchased from Admiral Steel. To give an idea of what that means 1095 is an industrial designation, meaning that the 1000 range specifies carbon steel and 95 means that it has approx. 0.95% carbon in it. CRA stands for cold-rolled annealed. That is a process to form the steel into shape and induce ductility or relieve internal stresses as a result of cold forming. 


Cutting my 1095 steel into manageable sections. It actually comes from Admiral Steel in 96” lengths. Cutting it into shorter lengths may limit the number of blades I can produce from them, but it also means less space taken up by the material.


First step cut the blank. Originally I was planning to take several paper copies of my design that I made earlier and cut them out and paste them onto the blanks. Because I don’ t think that the paper will hold up to this process, I'll simply make a template first. Later, I’ll want to cut each blank into a short rough size like the one I'm about to cut here. The overall length of the knife is 6 inches. 


 I’ll mark each blank on my stock and rough cut the length with the portaband saw. To allow for some extra material, I’ll cut them slightly oversized than what I need – say about 1/16” longer. 


My super-awesome DeWalt portaband saw. I’m using a 1/2”
 blade 24 TPI (teeth per inch). And it cuts great!


.

Rough cut design. The inner curve can be challenging. To get the curve in the finger choil area, I used a method known as “connect-the-dots” where a series of straight cuts are made close to the finished profile to allow material to break off out of the way as the profile gets cut. This is helpful when changing to a smaller blade may be too time-consuming and only the rough design is required for working.


Cut several straight lines up to the curve close to each other. 


As the main cut into the curve comes up, each smaller piece is cut off, making it easier to get a curve with a larger saw blade.


These small bits may be just scrap but I’m wondering if I can use them as spacers towards possible future folder knife designs. We’ll see. 


The template so far. Because I’m using a lot of photos to describe this process, I’ll post the next series of steps in my process in the next article.


Next up, grinding the profile. 


Tuesday, June 12, 2012

The Amateur Crafter: Back at it!

Well it’s been a bit of a hiccup here and there but the shop is finally at a point where I can start my knifemaking. By that I mean focus on not just making a knife, but creating a process that I can repeat and/or adjust for other knives. I’m not going to make just one knife design. I want to be able to make all sorts of knives: custom fixed blades meant for skinning, reproduction copies of common kitchen knives meant for food prep work, and eventually custom folder knives meant for utility purposes only.

Now I need a design. I don’t intend to work without a design. I am not some steel whispering guru or artist with the ability to “sculpt” the work as I go. The steel does not “speak” to me. And I want something more than just an idea or a picture to go by; I want an actual design with measurements, overall sizes, etc.

The delay in the projects from unexpected hospital bills resulted in allowing me to focus on the process for designing a knife. And from the designs I’ve made so far, I have to say that I really enjoy the design aspect of knifemaking. No doubt that it’s a process seldom used nowadays due to available CAD software, but it’s still an enjoyable experience. 


From the photos, one can see that I’ve been doing a bit of drawing and sketching on some graph paper. I’ve seen a few custom knifemakers out there now that still use this method. I’m sure that the process can be improved through CAD software like AutoCAD or SolidWorks. But drawing it out made me think more about overall size, blade length, location of the ricasso line as well as which equipment or tool I had available to cut the shape. This brings me to the point where I should start with some terminology in knives.

The overall design of the knife is something most folks are probably familiar with. The example drawing I found online can at least point to some of the terms I’ll be using. The ricasso area refers to a section of the blade itself that is not ground, just shaped bar stock.


Common knife terms.

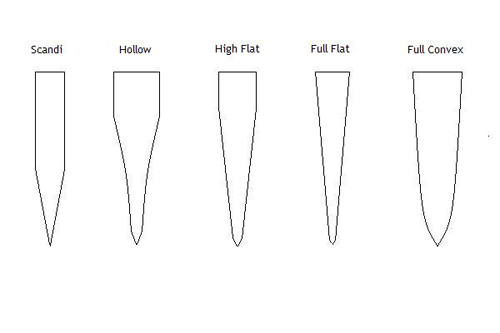
The grind is the section of the blade that has been shaped to a specific cross-section (cut-away section) for creating a particular type of cutting edge. The grind is very important to the purpose of the knife. Creating a grind such as a hollow grind (which is good for skinning knives) for a knife that may be intended for more utility purposes could be detrimental to the edge for its original purpose. Note the examples in the image. One may have to imagine cutting the knife blade exactly in half, then turning to see the cross-section of the blade. 


Some common knife grinds (cross sections). 

The tip can have an effect on the purpose of the knife as well. Take a look at some of the examples in the image. One may be very familiar with some of the shapes in the image. An example would be the clip-point style usually found on the well-known Bowie knives.


Knife Tips.

It should be noted here that I have no intention of making a weapon. I’ll explain. All knives are made with a specific purpose in mind and sometimes more than one purpose. This is understood by the grind (cut-away section) of the blade as well as the tip of the blade. For example, a utility knife meant for box-cutting would have a specific tip, maybe a sheep’s foot. And the grind might be the double-bevel. The bevel might not cut too deeply but it would help the knife retain a cutting edge longer because it’s fairly stout and the tip may have more rigidity from that design making it less likely to break. The overall description of such a knife indicates that it’s most likely a utility knife and it doesn’t have a lot of value as a defensive weapon.

A weapon such as a fixed blade with a spear point or a tanto point is much different than a utility knife like the one I described. The photo of a tanto knife can show how different the tip is from a sheep’s foot. Note also that the “tactical” knife has a cutting edge along the top of the blade as well – this is called a spear point. The tip of such a design obviously does not have the same strength for utility tasks as the sheep’s foot. And the grind may be something like a full-flat grind or a saber grind. This type of knife could have some use in utility but the tip indicates its intended use as a weapon; a weapon that can be easily inserted into something. Whether it’s for self-defense or possibly as an attack weapon, the so-called “single-purpose knives” primary use is as a weapon. The tip and grind design make it easier to use as a stabbing weapon rather than as a tool. 


The SOG Trident Tanto


Kramer Gutshot Fighter with a spear point tip. Note that the upper (spine) cutting edge does not go all the way back to the handle.

While it could be argued that a utility knife is still a knife or a weapon, its intended use is as a tool. In fact, the design of such a knife (utility) would make it a very poor weapon not at all suited for self-defense. The tip would make the blade much harder to stab into something, requiring much more force to be successful. The cutting edge isn’t meant to slice deeply but rather make shallow cuts and keep its edge for extended use. These (utility) knives are the designs I plan to make. In practice, I refuse to make a weapon but one could make the argument that a knife, regardless of its design, is still a weapon. But philosophically at least, when it comes to knives, I won’t make weapons in this shop I’ll make tools.

So to add a bit more of a delay, I wanted to be sure that I had a few safety items necessary for this shop and this includes personal safety gear. The respirator I have is a medium size and the filters are for particulates. Basically this means that the filters will not filter out vapors but rather dust particles. If I need to protect myself from harmful vapors (such as those resulting from consuming a bowl of lentils – LOL) then I would require not only different filters, but a different type of respirator, possibly a fully enclosed suit so that no vapors could get through the seal. As it is now, my mask doesn’t really seal that well against my face because I have a full beard. But that’s not a big concern because there won’t be a large break in the seal to allow huge amounts of dust particles inside the mask. 


My 3M half-face respirator with P100 flexi-filters and my face shield.

Additionally, I had to make sure I could mount a bucket to catch most of the particles from grinding. This is the stock removal method of knifemaking and it produces a lot of sparks especially from the lower carbon steels. This bucket will also provide me with a quench bowl to keep the blade material from overheating while I grind. Grinding produces a lot of heat and if the material heats up too much it will affect the properties of the steel. Having this bucket here allows me to quench a blade I’m working on as it heats up to keep it cool and continue working on it longer. 


It won’t catch all of the particles but it’ll help catch a lot of them. Plus, having water in this bucket makes a handy-dandy quenching pot.

And finally, I didn’t want to start all of this without my good friend Mr. Fire Extinguisher. Seriously though, this method of knifemaking will produce a lot of heat and a lot of sparks. Add into that anything that can burn for a fuel (such as saw dust produces from sanding, cutting or drilling any wood items) and you’ve now got yourself everything you need to start a fire. My shop is located in my basement and I very much would like to keep my house from catching on fire. Fire extinguishers can be purchased at nearly any hardware store and this particular model of mine is the dry chemical type. It’s good not only on typical wood, paper, or cloth type fires but it’s also good against electrical types of fires. This will help to protect any electrical equipment I have and I’ve got quite a lot setup in my shop and I’m about to get even more. 


Purchased from Home Depot.

Next up, the first design!


Wednesday, May 16, 2012

A Litte Break


With some of the recent hospital bills causing a delay in the shop and various projects, as well as a higher workload due to semester changes, I decided that it was time for a break. It’s good to get a little break from the everyday now and then. I’ve recently taken a brief trip to Bryson City, NC and stayed at a small cabin along the Deep Creek River. During that time, I hiked up the Deep Creek trail a bit to view some of the rapids and waterfalls along the river. Deep Creek has a very special meaning to me. I grew up visiting and camping at Deep Creek. I had relatives (now passed) that lived in Bryson City and the campground was very cheap to stay and best of all, it used to be open year-round. This meant that one could go camping during the cold months when all of the tourist-y, fair-weather campers were gone. That’s when I learned how to camp in cold weather. It’s no longer open year-round and the last time I checked the rates, while they are still cheap, they’re going up. When it comes to vacations, if I have a choice between the mountains or the beach, I’m the type of person that will always choose the mountains. Even the most crowded day I’ve spent in the mountains at peak tourist season was preferable to a day at the beach. But, that’s just me.

I’ve taken a lot of photos of Deep Creek before but I’ve never had the opportunity to take specific types of photos there. As an amateur photographer, I’m still learning a lot about digital cameras and their settings to adjust the quality of a photo. But one type of photo I think I’ve gotten good at is what I call a flow shot. I use that term to describe a photograph of water not necessarily captured in a split-second, but rather a slower exposure that captures the “movement” of water. Small rapids and waterfalls are a particular favorite of mine when it comes to this type of photograph, but it has a wider application as well. It requires a few things; one crucial requirement is correct lighting. When taking this type of photograph, too much light can be a bad thing. It’s best to have the shot hidden in the shade, or better yet, an overcast sky. This is the main reason why I don’t have a lot of “flow” shots of Deep Creek. The weather just didn’t make it easy to get those types of photos. But on this trip, the weather was wonderfully cooperative. The sun remained hidden behind overcast for most of the day. It didn’t rain on us and the temperature was cool. This helped with condensation, which can be a real hassle when working with different camera lenses. I took just over 300 photos, most in one day. And, I managed to get one or two critters on still. It’s also helpful to have a camera that can offer a lot of manual control over its settings. Having control over ISO, aperture and shutter speeds will allow one to take a photo with different levels of detail. And, from my photos one can see that many are of the same image, but with different settings. My camera is a Sony Alpha DSLR A390. Mine came standard with the 18-55mm lens but I also purchased an extended range lens, which I think is 50-200mm. Additionally, a darker filter lens would be helpful in reducing the amount of light taken in a longer exposure. It would’ve been nice if I was able to take more shots of the surrounding mountains but I only had so much time to work with. Typically with most good vacations, this one was just way too short.

There’s a reason I don’t often make videos with my pictures and that’s because of time, or more specifically, the lack thereof. I think that I’m not too bad with my camera and if I were to “go pro” I might just be able to earn a living as a professional photographer. But, I’m not a good video editor. In fact, as a video editor, I’d make a great machinist. The process is very slow, tedious work for me. Maybe I just don’t have the necessary base skills to be better at it. Or, maybe it’s just because Windows Movie Maker really sucks. But, facts are facts, and the fact is that I just don’t have the procedure of editing a video down to a time-efficient process. Because of my duties at the community college, I can’t offer up a lot of time for this process. So as a result, I don’t normally make videos despite having probably well over several thousand photographs of various places I’ve visited and of my home. But, some of these photos came out so good that I just had to share it.

These are images from Tom Branch Falls, Indian Creek Falls, and other spots all along the Deep Creek Trail.

Enjoy.

http://youtu.be/m_QcLtNWj3w

Tuesday, May 1, 2012

The Amateur Crafter: Project 1.1a: Pushing Perfectly Patent-able Prodigiously Pleasant Patinas

I apologize for taking so long to write another article. Just recently I received a hospital bill for just over $1000. As you can probably imagine, I was a bit shocked. I’ve been on the phone in contact with their financial office to try and setup interest-free payment options. This has put several of the projects I had active on hold temporarily until the payment options are setup. Because I’m so cautious, I’ve got enough money saved up to easily deal with a huge bill like that, but it can still sting the wallet. Interest-free payment options would allow me to pay off the bill at a financially easier pace. Plus, doing so would put my projects back on track and allow me to continue. We’ll see.

So let’s have another go at some patinas. I’ve taken some the first “blanks” that some students and I machined on a CNC milling center. These were not shown in previous articles but they were among the earliest knife patterns we cut. The material is 1/8” precision ground O-1 steel. O-1 is oil-hardening steel that’s commonly used in industry where cutting edge retention and deformation resistance is high. Stamping dies and plastic injection molds are often made from O-1. Stamping dies need to be able to keep a good cutting edge and injection molds are subjected to high temperatures (due to melted plastic.) Some knifemakers prefer O-1 steel for their blades due to these properties. 


Since vinegar proved to be a good medium to force a patina on my last pieces, I decided to “kick it up a notch” with the corrosion on the steel by heating up the vinegar. I went to a Dollar Tree store and purchased the cheapest vinegar they had. Also, I bought a new pot to boil the vinegar in because I really don’t feel like using some of my good pots for this. Since I rarely use wire hangers, I bought a small package of those as well. Finally, some 000 extra fine steel wool from the hardware store finished up my supplies. I’ve a few other supplied used in this project but those were older purchases that I had around the shop.

I poured all of the vinegar into the pot and set it to heat up on my stove. Next I “un-twirled” the wire hanger at the hook and cut a section off with a set of wire cutters. I needed the “hook” end to pick-up and lower the blade blank into the medium. 


While the medium was warming up, I took some carburetor cleaner to the blanks and used a Scotch-Brite scouring pad to remove any existing rust and dirt. It’s not necessary to use “carb-cleaner”, a simple cleaning solution that can remove a bit of oil or dirt should be fine. I just happen to have carb-cleaner on hand. The pads can be purchased pretty cheap at most grocery stores or drug stores unless one simply wants to buy them from the hardware store. They’re usually a bit more expensive through the hardware store. So, by the time the medium was ready my blanks were cleaned and ready to go.


Once my blank went into the vinegar I immediately saw an effect. I didn't get any photos of it but basically I saw thousands of micro bubbles begin to pop up all over the steel submerged in the medium. Basically, this was the corrosion happening on the steel. I left the blank in the pot for about 40 minutes before removing to inspect it. And I have to say, I’m quite pleased with the result. The blade looks quite weathered as if it were an old knife that’s seen extensive use. I considered trying to grind an edge to give it a contrast look but I’m going to wait until I can purchase more belts. I may try later with just hand files, if only to see how it would look. 


Compared with the other blank the "cooked" blank appears quite weathered.


The medium level drops as its boiling and this produced a curious set of “ripples” along one side of the blank. The effect was unintended but I like the result.


After the patina I took the blank out and ran it under the faucet in my sink to cool it down. I checked its durability with the steel wool and the patina seems fairly deep into the blank. Then a liberal amount of oil rubbed on with a lint-free cloth to protect the blank from further corrosion. 

The cost of the project was low and I learned a lot from the experience.


32 oz bottle of vinegar - $1
3 qt cooking pot - $7
10 pk coated wire hangers - $1.35
Scotch-Brite scouring pads - $3
Extra fine steel wool - $3
16 oz WD 40 - $3
Total costs - $17 (approx.)


So basically the entire project was done for less than $20. Not bad at all considering the fairly small effort used to keep the cost down. Good thing too since I've been slammed by an unexpected hospital bill. One thing I learned, when boiling the vinegar, be sure to have more than what’s needed. I ran out and I couldn’t add more to the pot. As a result, the medium dropped in level. I should’ve purchased more vinegar but the final result still looks great. Another major point I learned about this process is the quite strong odor the medium produced from boiling. I expected some, but this was stout. Not only was it decidedly not pleasant, it would sting my nostrils and throat if it was breathed in. I think that I will add another equipment purchase to my shop wish list for the future. I’m going to invest into a well-made hot plate and extension cord, so that I can create patinas outside.